How to import Contacts to Salesforce from a Spreadsheet
Importing contacts into Salesforce in bulk may seem easy, but it often presents several challenges. Problems like inconsistent data, duplicate entries, and mismatched field mappings can complicate the process. Identifying these obstacles early on can help you avoid errors and save time.
This blog will discuss the critical challenges of bulk contact imports in Salesforce and how to overcome them efficiently with spreadsheet-friendly tools.
What are the challenges of Bulk Contact imports?
Bulk importing contacts into Salesforce can be easy with the proper preparation, but it does come with challenges:
- Inconsistent Data: Data from multiple sources often have different formats, resulting in failed imports. For instance, some records may have phone numbers in various formats (e.g., “123-456-7890” vs. “(123) 456-7890”), or currency formats may not match.
- Duplicates: Duplicate records are a common problem during bulk imports. Without proper de-duplication processes, you may end up with multiple entries for the same contact, affecting data quality.
- Field Mapping: When importing data, the fields in your spreadsheet must match those in Salesforce. For example, if your spreadsheet has a “Full Name” column, but Salesforce requires separate “First Name” and “Last Name” fields, the data won’t import as expected unless you map it correctly.
- Error Handling: Importing large datasets often leads to errors, such as missing fields or incorrect data formats. Identifying these errors and fixing them can be time-consuming if done manually.
- Limited Scheduling Options: Some tools don’t offer the ability to schedule recurring imports. Users must manually initiate the import each time, which can become inefficient when handling regular updates.
Why would a spreadsheet be your best ally for mass-importing Contacts?
- Collaboration: One of the most significant advantages of spreadsheets is their collaborative nature. It allows multiple users to work on the same document simultaneously, so teams can divide the work between cleaning and preparing contact data. Sales or marketing teams can gather new leads or contacts, and administrators can finalize the data before importing it into Salesforce.
- Data Cleanup: Spreadsheets allow you to clean up your data before importing it with filters, conditional formatting, and formulas to detect duplicates, fix missing fields, or reformat data to fit Salesforce’s requirements.
- Efficient Data Management: Spreadsheets offer a visual interface that simplifies reviewing and editing your data. Quickly identify and rectify errors, ensuring the accuracy of your information before importing it into Salesforce.
Also Read: Salesforce Data Cleansing in a Spreadsheet – Why is it a best practice.
Leads vs. Contacts in Salesforce:
In Salesforce, leads and contacts are essential for organizing your sales pipeline. Leads are potential customers, while contacts are those you’ve already qualified and connected to accounts. Knowing the difference helps you manage your sales process more effectively.
Let’s look into the key differences between leads and contacts and how to handle them in Salesforce.
| Category | Lead | Contact | ||
| Source |
|
It can be created directly or through lead conversion. | ||
| Association | It’s not associated with other records like Opportunities, Accounts, or other Leads/Contacts.
|
Associated with at least one Account and possibly multiple Opportunities or other Contacts within the same Account. | ||
| Qualification | Represents raw, cold, or low-contact prospects who the Sales team still needs to qualify. | They are generally created after qualification or directly as Contacts. |
Also see this related subject: https://www.xappex.com/blog/mass-import-leads-to-salesforce/
Xappex: Spreadsheet-Powered Tools for Efficient Contact Imports
Xappex simplifies bulk imports into Salesforce using tools like G-Connector for Google Sheets and XL-Connector or XL-Connector 365 for Excel. These tools allow you to manage data directly in a familiar spreadsheet interface while ensuring smooth synchronization with Salesforce.
Field Mapping: Xappex tools easily map spreadsheet columns to Salesforce fields, ensuring accurate data imports to the necessary field.
Automation and Scheduling: Xappex offers scheduling options to automate contact imports at regular intervals, reducing the need for manual updates.
Automatic Error Handling: Bulk imports often present challenges with error handling. Xappex addresses this by automatically detecting errors using logs and alerting you to any spreadsheet issues.
Collaboration: These tools support real-time collaboration, allowing multiple users to review and edit spreadsheets before importing, ensuring data accuracy.
How do you import Contacts into Salesforce with XL-Connector 365?
Install and open XL-Connector 365 with the spreadsheet containing your contact data. Arrange the data in the spreadsheet, with each column aligned with the Salesforce fields.
Log in to Salesforce: Log in to your Salesforce org and ensure you have the necessary permissions to import data.
Start the data Import: Select the rows of data you want to import.
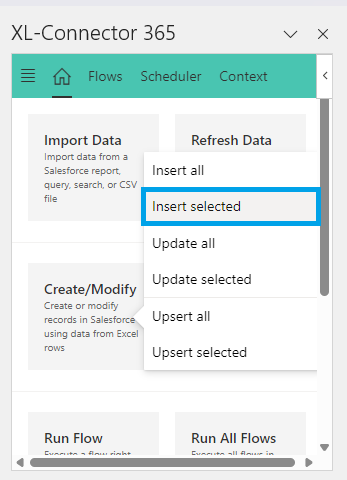
In XL-Connector 365, navigate to the Home tab, which will open a side panel. Click “Create/Modify” and select “Insert Selected” to import your data into Salesforce.
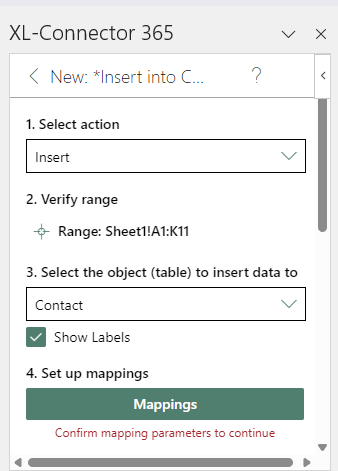
- Choose the Salesforce Object: Select the Contact object in Salesforce where you want to create the records.
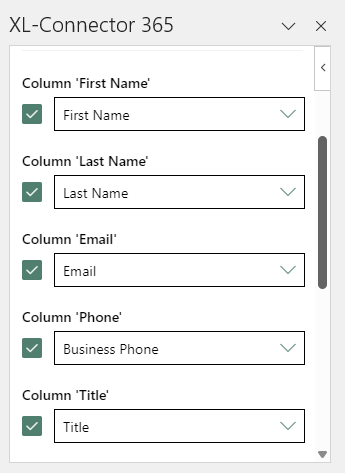
- Map Data Fields: Click “Mappings” to match your spreadsheet columns with the corresponding Salesforce fields. Review and confirm the mappings, then click “Apply” to save. You can also set constant mappings for specific fields if necessary.
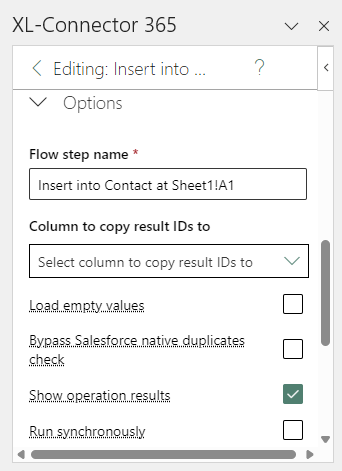
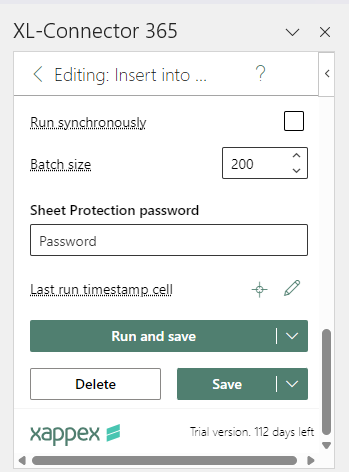
- Configure Import Settings: Adjust the settings for the Insert operation. You can save these settings as a reusable Flow Step for future imports, which will help manage errors if they arise.
- Execute and Save: Click “Run and Save” to perform the import with your configured settings and save them for future use. Alternatively, you can click “Run” to execute the import without saving the settings or “Save” to store the settings without immediately running the import.
Review the Results: After completing the import, review the results. The new record Ids and details about the import operation will be displayed next to your original data in the spreadsheet.
How do we automate the upload process?
XL-Connector 365 allows you to set up automated tasks, called Flows, for importing and exporting data from Excel. Flows store details about specific jobs and can be run manually or automatically using the Scheduler.
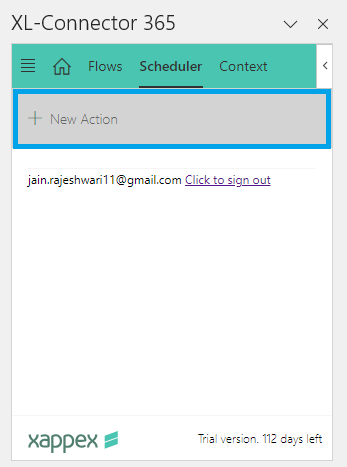
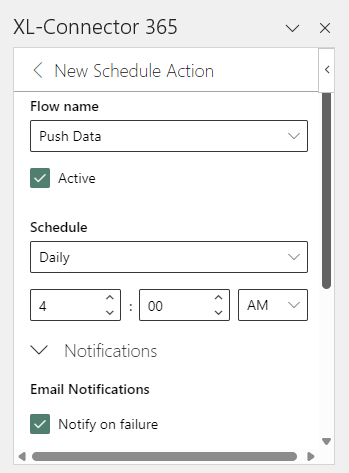
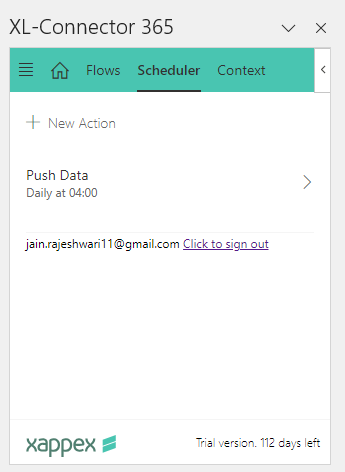
Click “New Action” from the Scheduler Tab to create a new schedule. Then, select a flow name and set the frequency according to your requirements.
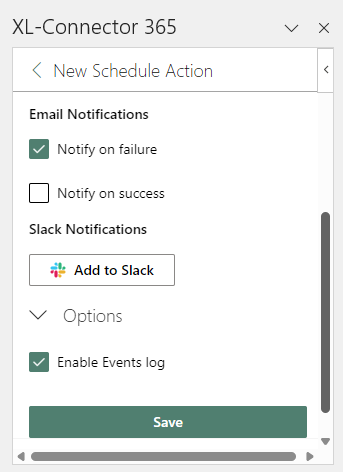
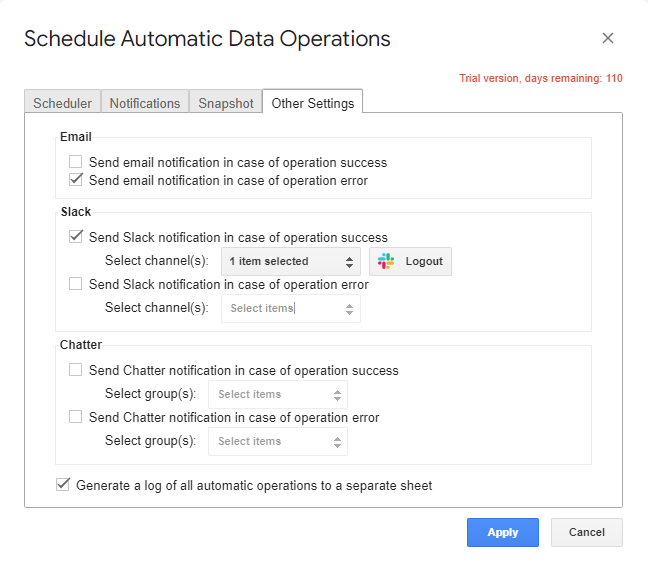
You can set Email or Slack notifications based on success or failure to ensure that schedules are running as expected. Enable the event log to ensure you get errors while running the schedules.
Once you click Save, the schedule for a particular flow will appear in the Scheduler Tab.
Import Contacts into Salesforce from Google Sheets with G-Connector:
Do you need an easy way to insert contacts from Google Sheets into Salesforce? G-Connector simplifies managing your contacts directly from Google Sheets.
Let’s learn how to set everything up and get your contacts into Salesforce in just a few easy steps.
Set Up Your Google Sheet
- Ensure you’ve entered all your Contact information (name, email, phone number, etc.) in a Google Sheet. Each column should match a field in Salesforce’s Contact object.
Login and Launch G-Connector.
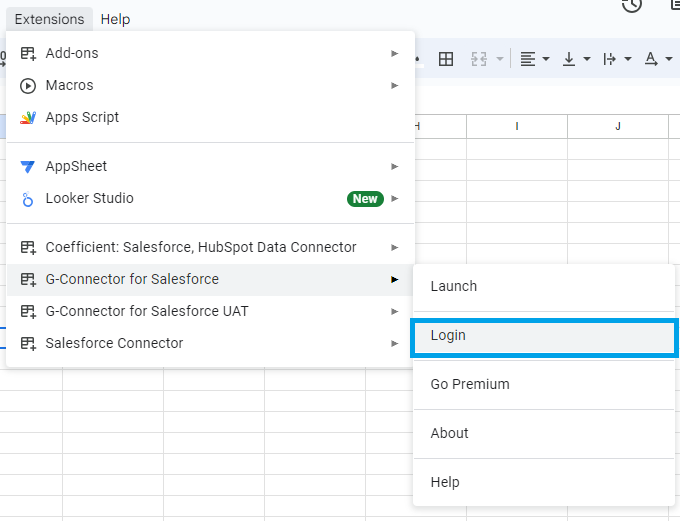
- Open your Google Sheet and go to the Extensions tab. Select “G-Connector for Salesforce” and click on “Login.”
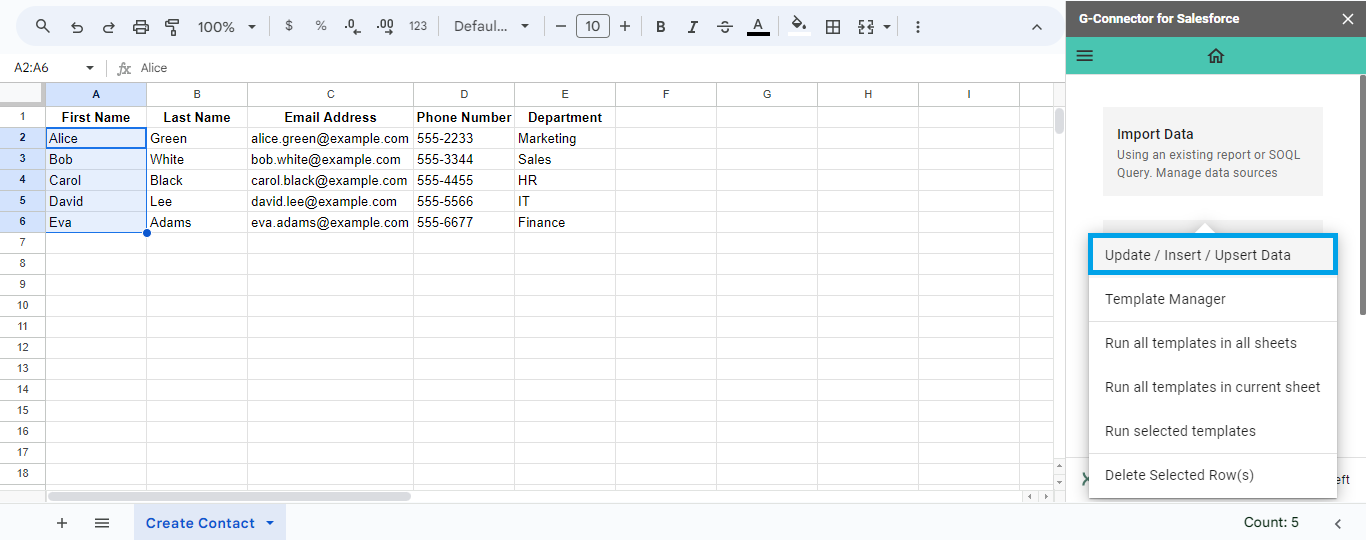
- Click “Launch” to open the G-Connector side panel. Select the contacts to be inserted, then click “Create/Modify/Delete” in the panel and choose “Update/Insert/Upsert Data.”
Map Your Contact Fields
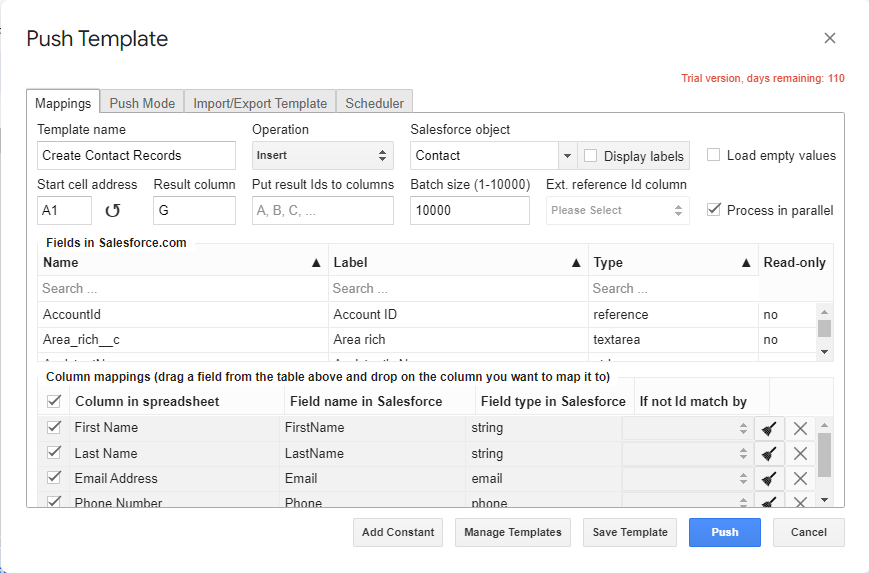
- A dialog box will pop up. Select the action as “Insert,” and the object will be “Contact.”
- G-Connector will try to automatically match your Google Sheet columns to the fields in Salesforce. Check the mappings to ensure everything is correct. You can adjust them by dragging fields from the list to the proper columns.
Save Your Mapping Template (Optional)
- If you regularly upload contacts, you can save your mappings as a template. It saves time and ensures consistency for future imports.
Upload Your Contacts
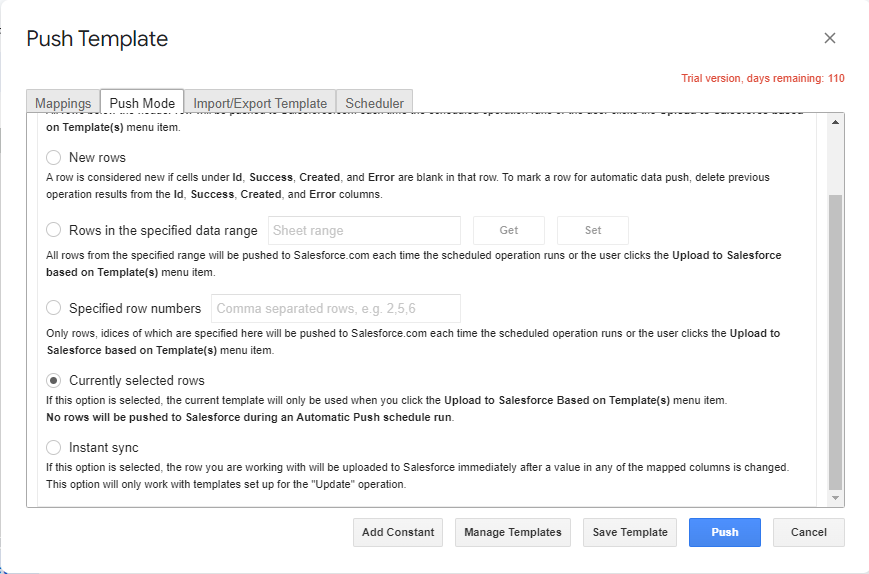
- Once everything is set, click Push to insert the contacts into Salesforce. You will see a new column in your Google Sheet showing whether each contact was successfully imported.
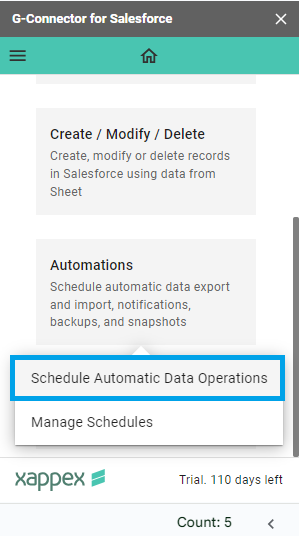
Navigate to “Schedule Automatic Data Operations” under the Automation section to minimize manual effort for repetitive tasks.
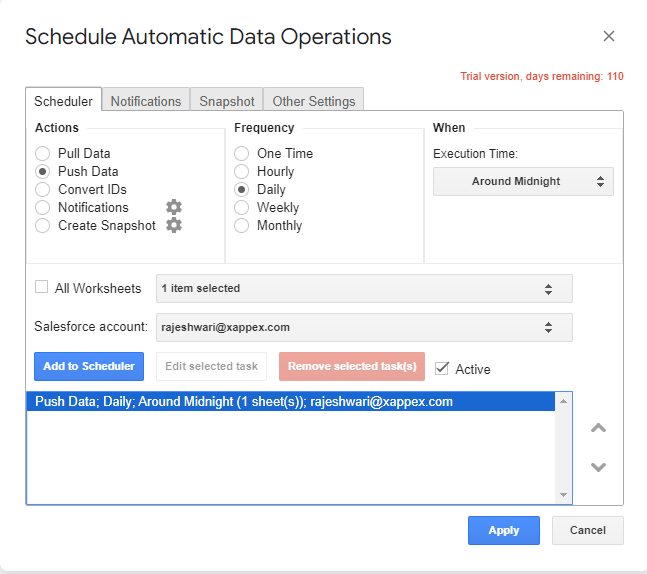
Select “Push Data” as the action, specify the Frequency and Time, choose the relevant worksheet, and click “Add to Scheduler.”
Conclusion:
Spreadsheets are a valuable tool for managing and preparing contact data before importing. Their collaborative nature and ability to handle large datasets make them well-suited for this task.
Tools like XL-Connector or G-Connector, with its spreadsheet-powered automation features, further simplify the process by scheduling tasks, handling errors, and facilitating collaboration. Using these tools and strategies can streamline your contact imports, improve data quality, and ultimately enhance your sales productivity.
Start a 30-day free trial of XL-Connector , XL-Connector 365 , G-Connector and see an immediate boost in your data management!

Xappex CRM data management solutions

Looker Studio for Salesforce
Connect Salesforce reports and queries to your Google Data Studio dashboards.

Excel Merge
Calculate advanced Excel models. Generate Excel documents based on Salesforce data. All with a single click from a Salesforce record page.
