
Salesforce Screen Flow: From Basics to Deployment
Salesforce Screen Flows provide a structured way for users to complete tasks. They present a series of screens that prompt users to enter information or make selections, facilitating processes such as surveys.
Screen Flows can be integrated into various parts of Salesforce, including Lightning pages, utility bars, and quick actions, making them accessible where needed. Screen flows use conditional logic and validations to guide users through processes efficiently, reducing errors and minimizing the need for extensive training.
What Is Salesforce Screen Flow?
Salesforce Screen Flow is a flow type that guides users through a process using a series of interactive screens. Unlike flows that run in the background, Screen Flows involve users by presenting clear, step-by-step instructions, which makes it easier to complete tasks. They work well with Lightning Pages and Experience Cloud, improving user interactions without adding unnecessary complexity.
Why Choose Screen Flows?
Screen Flows improve how users interact with Salesforce by replacing scattered steps with clear, organized workflows.
Key Benefits of Screen Flows
Enhanced User Experience: Guide users through processes with clear instructions, reducing confusion and training time.
Fewer Errors: Validate real-time inputs to prevent incomplete or incorrect data entry.
Streamlined Logic: Simplify multi-step tasks, such as record creation or approvals, into a single, cohesive flow.
Practical Use Cases
- Client Onboarding: Automate form collection, document uploads, and service selection in a guided sequence for new customers.
- Service Requests: Enable employees to submit tickets with predefined fields, ensuring all necessary details are captured upfront.
- Interactive Surveys: Collect feedback using a survey interface that walks users through each question one step at a time.
- Record Creation: Assist users in creating records by leading them to fill in all required fields correctly.
Where and How to Deploy Screen Flows in Salesforce?
Screen Flows can be placed in several areas of the Salesforce platform to make them available where needed. We can display screen flows in high-traffic areas of Salesforce to maximize visibility and usability:
Lightning Pages: Add flows to Home Pages, Record Pages, or App Pages using Lightning App Builder.
Utility Bar: Pin frequently used flows for quick access during daily tasks.
Quick Actions: Trigger flows directly from buttons in the Salesforce header or record pages.
Implementation Tips:
- Use conditional visibility to display flows only to relevant user profiles or under specific criteria.
- Test flows thoroughly in a Salesforce sandbox before deployment.
- For example, a flow for submitting feedback can be added to the Service Cloud homepage via App Builder by dragging the Flow component into the layout.
Types of Screen Components
Input Components
These components capture user input and interact directly with Salesforce data.
- Text Fields: Capture text-based data (e.g., names, comments). We can use validation rules (e.g., regex) to enforce formats like phone numbers or emails.
- Picklists: Offer predefined dropdown choices (e.g., priority levels, statuses). Use global picklists to maintain uniform values across objects and flows.
- Checkboxes/Toggles: Enable yes/no decisions (e.g., opt-ins, approvals).
- Date/Time Pickers: Allow users to select dates or times (e.g., deadlines).
- Rich Text Areas: Collect formatted text (e.g., detailed notes with bullets or links).
- File Upload: Let users attach files (e.g., contracts, images).
- Password: Component to enter password
- Images: Add visuals like logos, flow diagrams, or infographics.
- Progress Indicators: Show users their position in a multi-step flow.
- Message Components: Highlight warnings, errors, or success alerts.
Display Components
These components show information without requiring input:
- Text: Display static labels, dynamic merge fields, or instructions. We can use formulas in the text to concatenate data (e.g., “Hello, {!$User.FirstName}”).
- Sections: Group related components into collapsible containers for cleaner layouts.
Advanced Components
These enable complex interactions or integrations:
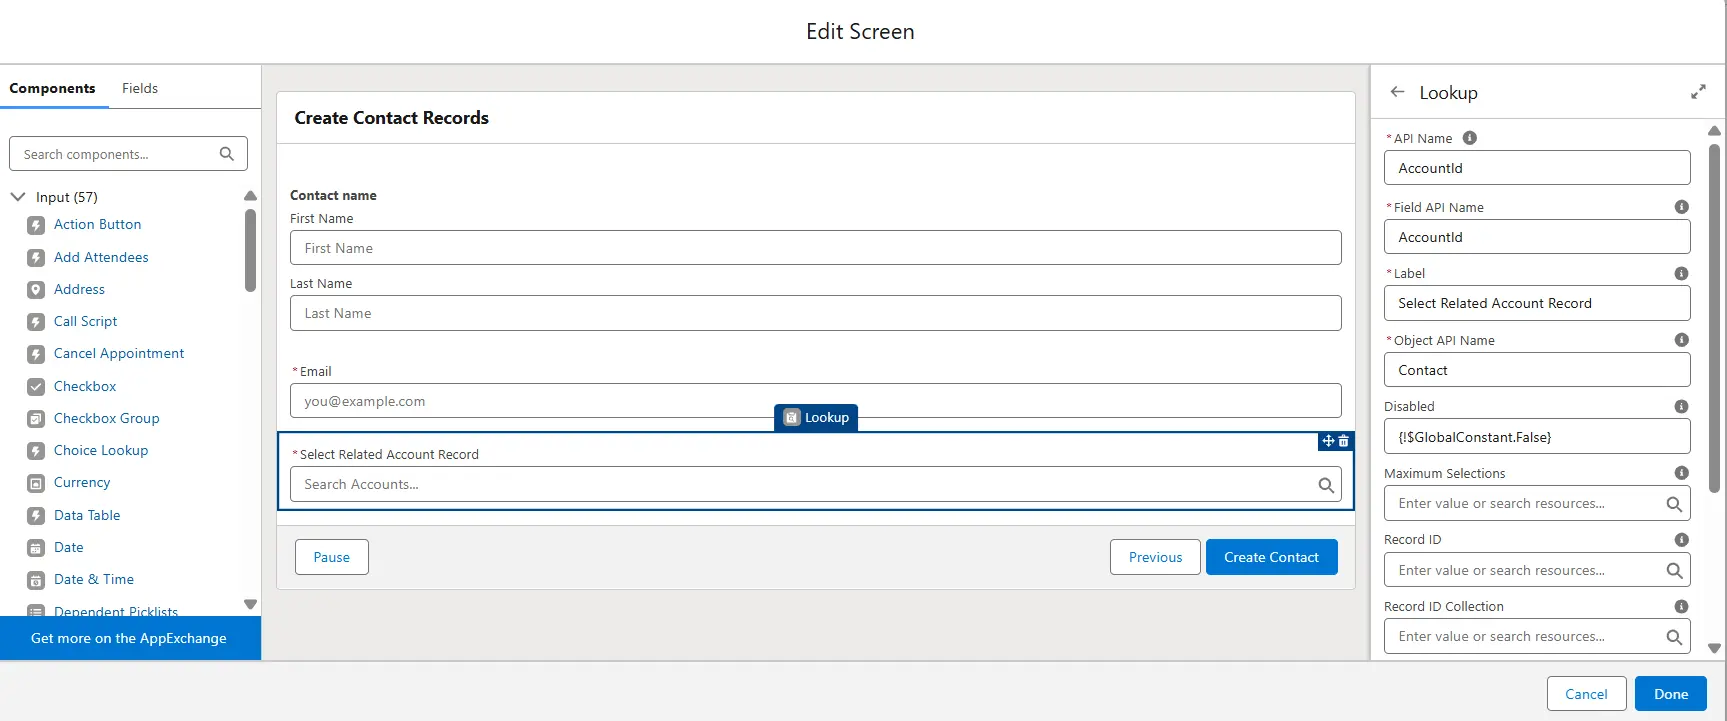
- Lookup Fields: Search and link Salesforce records (e.g., link a Contact to a Case). Use Filter lookup results using the filterLogic attribute to limit irrelevant records.
- Data Tables: Display or edit related records (e.g., line items in a quote).
If you’d like to see how to set them up, take a look at this detailed guide which walks you through the process. - Record Forms: Auto-generate forms using page layouts for standard/custom objects.
- Flow Formulas: Perform calculations or logic mid-screen (e.g., discount totals).
- Custom Lightning Components: Embed custom-built LWC/Aura components for unique use cases.
How Screen Flows Work Behind the Scenes?
Screen flows in Salesforce guide users through business processes by presenting screens to collect information and then acting on it. They manage data through variables, decisions, and actions to provide a smooth user experience.
Data Movement Through Variables and Actions
In a Screen Flow, data is handled using variables. When a user inputs information into a screen, the flow assigns this data to respective variables, temporarily storing the information.
Based on the requirements, this data can be used to create new records, update existing ones, or perform other actions within Salesforce.
Pausing for Input and Logic Execution
Screen Flows can pause to await user input. Once input is received, the flow assigns the data to variables and evaluates it against predefined criteria to determine the next steps, aligning actions with business logic.
Decision Elements in the Flow
Decision elements allow the flow to choose different paths based on variable data. For example, if a variable indicates an urgent customer request, the flow might route the process to a high-priority queue, handling various scenarios dynamically.
How to Create a Salesforce Screen Flow?
Salesforce Screen Flows allow you to build custom processes without writing any code. In this guide, you’ll learn how to create a flow that collects user information, creates a Contact record associated with an Account, and then confirms the successful creation.
Flow Setup
- Login to Salesforce and go to Setup. Under Process Automation, select Flows and click on New Flow.
- Choose Screen Flow and then click Next.
- Name your flow (for example, “Create Related Contacts Flow”) so it’s easy to identify later.

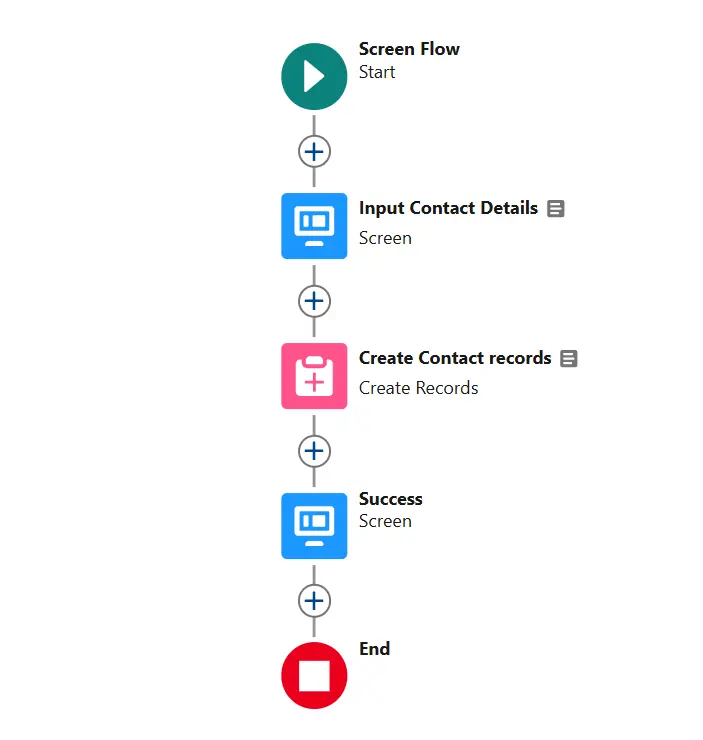
Designing Screens and Fields
- Add a Screen element and Label this screen “Create Contact Records”
- Add fields to capture the Contact’s Name, Email, and AccountId.
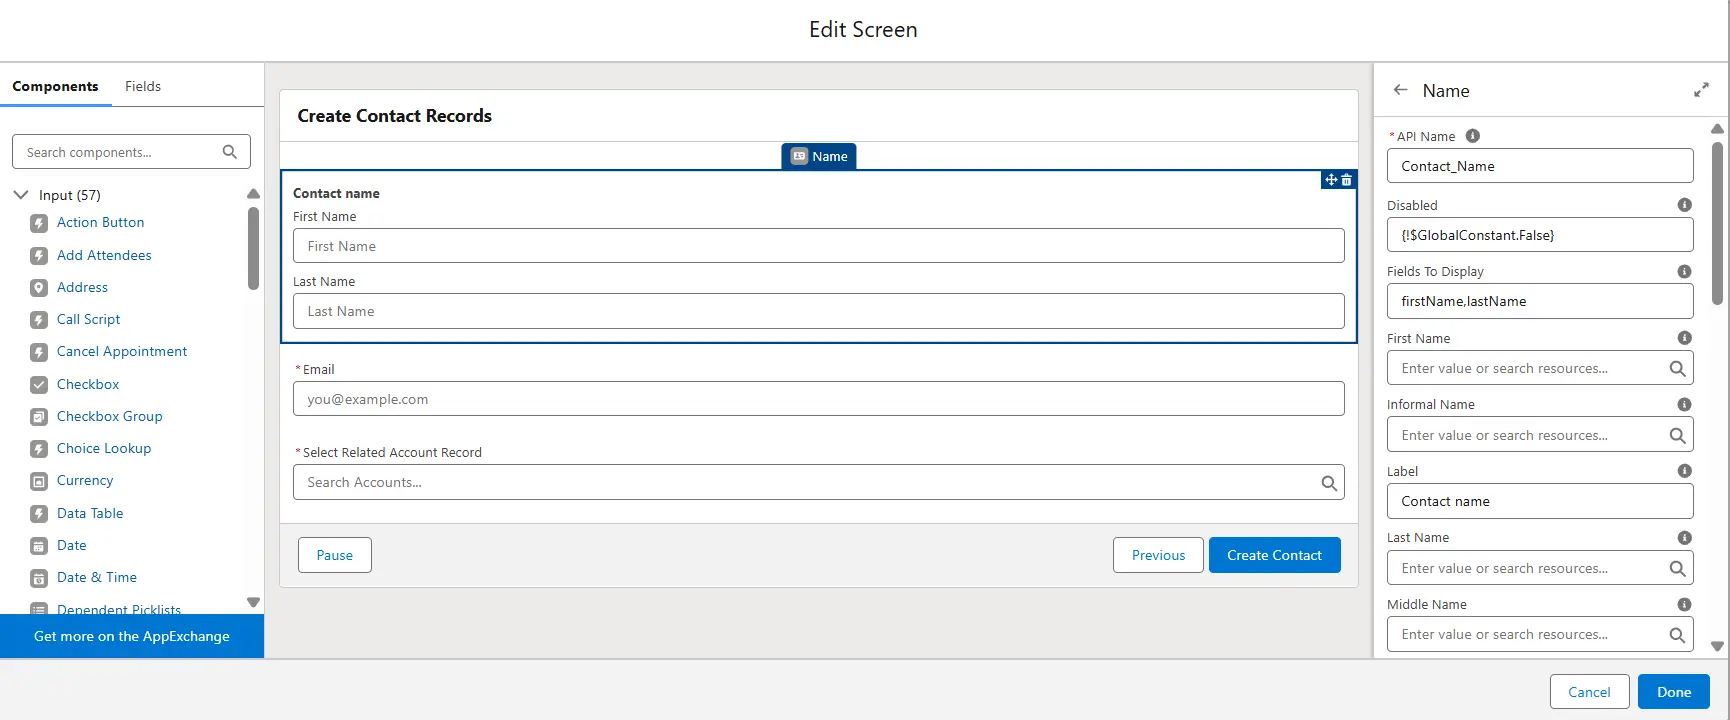
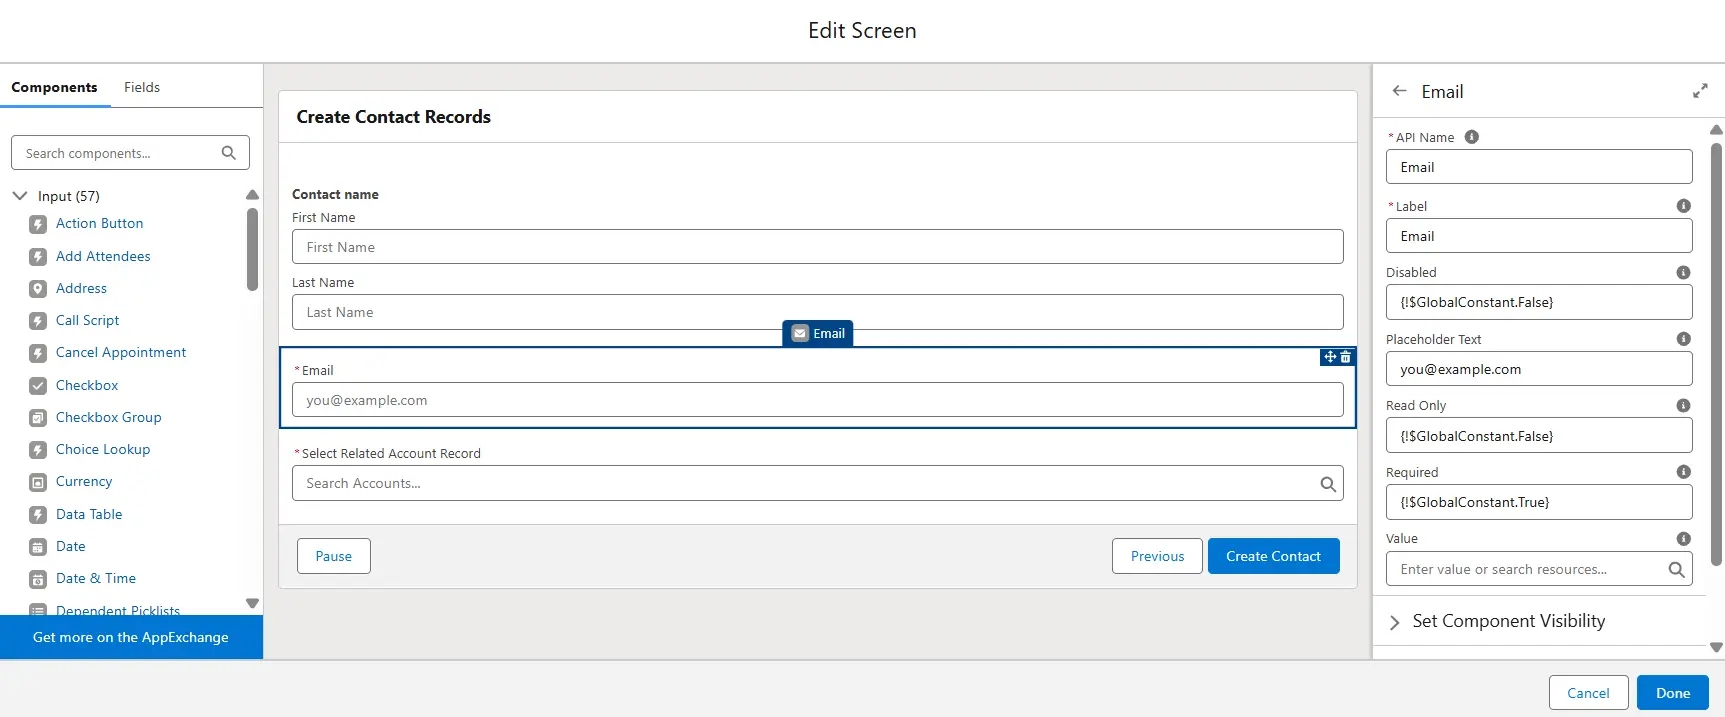
You can choose to create validation rules that check the accuracy of the entered details. Assign clear, descriptive labels to each field and provide concise help text to guide users.
Adjust the layout to ensure the screen is visually appealing and easy to navigate.
Creating Logic and Records
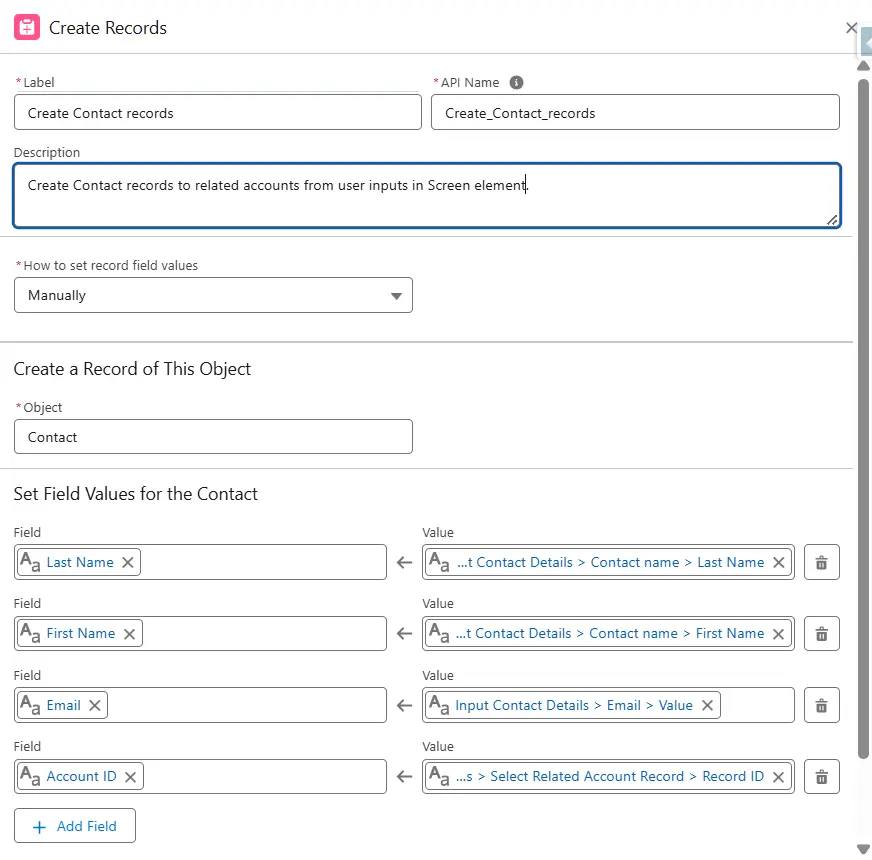
Add the Record Creation Element
- Add the Create Record element next to the Screen element.
- Configure this element to create a new Contact record by mapping the fields from the previous screen (Name, Email) and linking the Contact to the Account via AccountId.
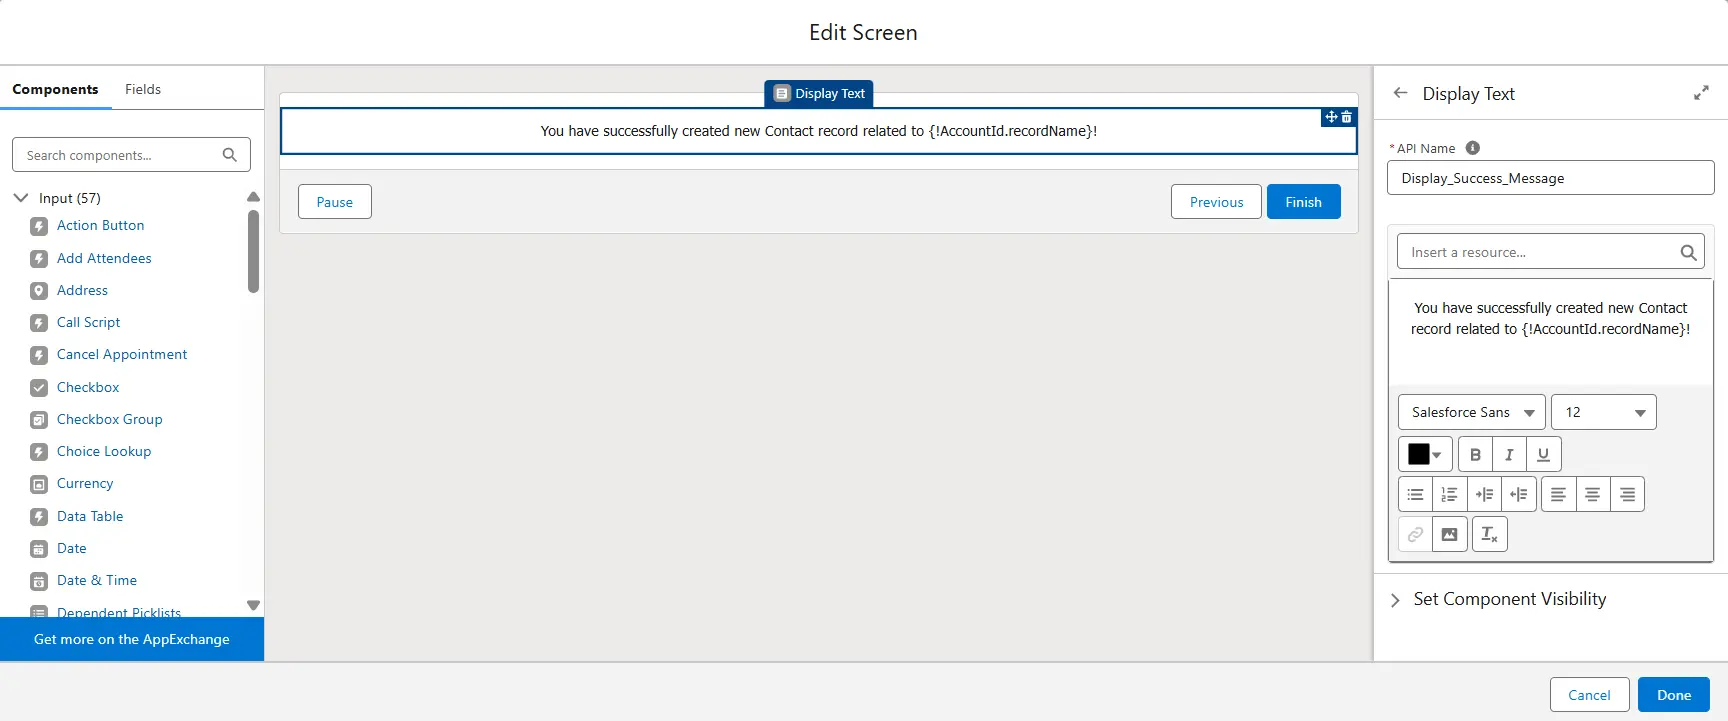
Provide Confirmation
Insert another Screen element that displays a confirmation message which will help users know that their input was processed correctly.
Testing
- Use the Debug option in Flow Builder to simulate the flow with sample data.
- If errors occur, review the element configurations or data validations till the flow operates as expected.
- Record the test cases and outcomes for future reference, ensuring the flow functions correctly in various scenarios.
Activation and Deployment
- When testing is complete, activate the flow by clicking the Activate button. To avoid confusion, deactivate any previous versions.
- Add the flow to a Lightning page, utility bar, or as a Quick Action as needed.
Want to see more examples?
Check out this article, where you’ll learn how to configure a Screen Flow with a data table component, enabling users to select and update records in real time.
Advanced Features in Salesforce Screen Flows
Salesforce Screen Flows offer key features to expand functionality and adaptability.
Screen Actions
Screen Actions let users interact with the flow by adding buttons, links, or other elements that trigger specific steps. These actions guide users through processes while maintaining control over navigation.
- Customer Onboarding: Add “Save & Exit” or “Next” buttons to let users pause or progress through multi-step forms.
Conditional Logic
We can display or hide fields, sections, or screens based on user inputs or data values using Conditional Logic. It modifies the flow experience to individual needs.
- Surveys: Based on a participant’s initial responses, skip irrelevant questions, such as hiding business-related queries for personal account holders.
- Automatic Discounts: Add a 10% discount to deals over $10,000 without manual input.
- Custom Fields: Show “International Shipping” fields only when a customer picks “Global Delivery” in an order form.
Dynamic Forms
Dynamic Forms improve screen flexibility by allowing you to insert fields directly onto the screen, similar to how Lightning’s Dynamic Forms operate. We can change the layout and field visibility as users interact with the flow.
- In a support flow, warranty-related fields appear only when an agent selects the warranty claim option, reducing unnecessary information.
Common Mistakes to Avoid
Poor Labelling and Documentation
- Label each Flow element clearly and add written descriptions where needed. Record versions to track changes over time.
- Good documentation saves time when debugging or making updates later.
Technical Errors and Debugging
- Missing Fault Paths: Failing to add fault paths or proper error handling in the Flow can leave users with unspecific $Flow.FaultMessage errors and make debugging difficult.
- Overlooked Debugging Features: Not using built-in tools or procedures to debug the Flow may result in missing subtle errors or not capturing complete fault details.
- Inadequate Error Handling: Introduce custom error elements to catch and report issues. Provide clear error messages with suggestions to help users understand what went wrong and how to fix it quickly.
- No proper Log Analysis: Ignoring the importance of analyzing logs and error messages can lead to recurring issues and prolonged troubleshooting.
- Limited Testing with Diverse Data Sets: Test Flows with various data sets instead of relying on just one sample. It helps avoid unforeseen errors when the Flow runs with real-time data.
- Skipping Sandbox and Production Tests: Test your Flows in sandbox and live settings. A Flow that works in a test area might act differently in a live environment. Running tests in both contexts minimizes the risk of unexpected issues in daily operations.
User Experience (UX) Pitfalls
- Too Many Fields on a Screen: Displaying numerous fields at once can overwhelm users, making it difficult for them to focus and complete tasks efficiently.
- No Cancel or Back Options: Omitting clear exit points, like cancel or back buttons, restricts users from easily navigating away or undoing actions.
- Missing Validations: Not implementing input validations can allow errors to go unnoticed, leading to issues later in the process.
- Unclear Navigation: A disorganized flow between screens can confuse users, making it hard for them to understand where they are and what to do next.
Conclusion
Salesforce Screen Flows make everyday tasks easy by turning them into clear, interactive experiences. They help simplify processes like onboarding new clients, handling service requests, and managing data by checking input as you go.
Start with simple projects, different layouts, validation rules, and forms to see what works best. Use Trailhead for clear, step-by-step guidance and the Xappex blog for more advanced tips.
Keep refining, testing, and improving your flows.

Xappex CRM data management solutions

G-Connector for Salesforce
Connect your Salesforce data to Google Sheets in a two-way sync.

XL-Connector for Salesforce
Connect and export your Salesforce data to Excel.

Looker Studio for Salesforce
Connect Salesforce reports and queries to your Google Data Studio dashboards.

Excel Merge
Calculate advanced Excel models. Generate Excel documents based on Salesforce data. All with a single click from a Salesforce record page.

XL-Connector 365
Connect and sync Microsoft Excel on all platforms with Salesforce.