How to Manage Picklist Metadata in Salesforce
Managing picklist metadata in Salesforce can be a daunting task for many admins. The process of creating, updating, and maintaining picklists manually is time-consuming and prone to errors. From dealing with inconsistent data to the complexities of ensuring that all necessary picklist values are available across various objects, the challenges are numerous.
However, there are easier ways to manage picklists in bulk. Special tools like XL-Connector can save you tons of time and significantly increase your admin productivity. In this article, we will delve into the intricacies of managing global picklists in Salesforce, discuss common challenges, and demonstrate how XL-Connector can be your ultimate solution.
What is a Global Picklist in Salesforce?
A global picklist in Salesforce is a reusable set of picklist values that can be shared across multiple objects. This feature is particularly useful for maintaining consistency in picklist values across different fields and objects. Unlike regular picklists that are specific to a single field on a single object, global picklists are created once and can be used wherever needed.
Global picklists are associated with metadata because they are part of the configuration settings of your Salesforce instance. Metadata, in this context, refers to the data that describes other data, providing information about the structure, operations, and constraints of the Salesforce environment. Managing this metadata efficiently is crucial for maintaining data integrity and consistency across your Salesforce instance.
Challenges When Managing Your Picklist Metadata Manually in Salesforce
Managing picklist metadata manually in Salesforce comes with several challenges:
- Time-Consuming Process: Manually creating and updating picklists for multiple fields and objects can take a significant amount of time.
- Human Errors: The likelihood of making mistakes increases with manual data entry, leading to inconsistent picklist values.
- Lack of Consistency: Ensuring consistency across multiple picklists is difficult when each one is managed separately.
- Difficulty in Bulk Updates: Making bulk updates to picklist values across various objects and fields is cumbersome without proper tools.
- Limited Visibility: Tracking and auditing changes to picklist values is challenging without a centralized management system.
XL-Connector: Your Ultimate Tool for Efficiently Managing Global Picklists
XL-Connector is a powerful tool that simplifies the process of managing Salesforce metadata, including global picklist value sets, as well as standard and custom ones. Here’s how it can make your life easier:
- Bulk Management: XL-Connector allows you to create, update, and delete picklist values in bulk, saving you time and reducing the risk of errors.
- Consistency: By managing all your picklist values in one place, you can ensure consistency across your Salesforce instance.
- Ease of Use: The intuitive interface of XL-Connector combined with a familiar spreadsheet environment makes it easy for admins of all skill levels to manage metadata.
- Comprehensive Metadata Tools: In addition to global picklists, XL-Connector provides tools for managing other metadata types such as custom objects, fields, validation rules, and workflows.

How to Download Your Picklist Metadata
With XL-Connector, downloading your picklist metadata is a straightforward process:
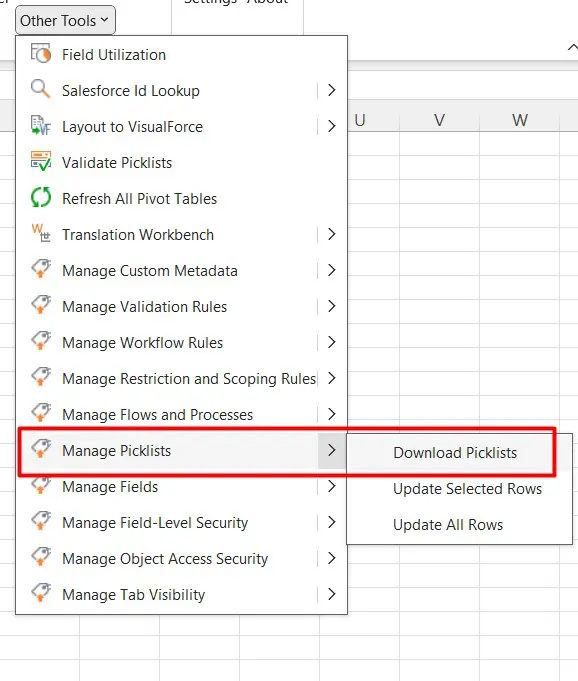
- Connect XL-Connector to SF: Log in to your Salesforce instance.
- Choose the option from ‘Other Tools’: Choose the ‘Manage picklists’ option from this section.
- Download Metadata: Click on the download button to export the picklist metadata to an Excel spreadsheet.
- Select the value set: Select the object for Standard or Custom picklist value sets or the name of the Global Value Set.
How to Create Values in Picklist Value Sets in Salesforce
How to perform this in the Salesforce interface
Creating values in Picklist Value Sets in Salesforce can be done through the Salesforce UI. Here’s a step-by-step guide:
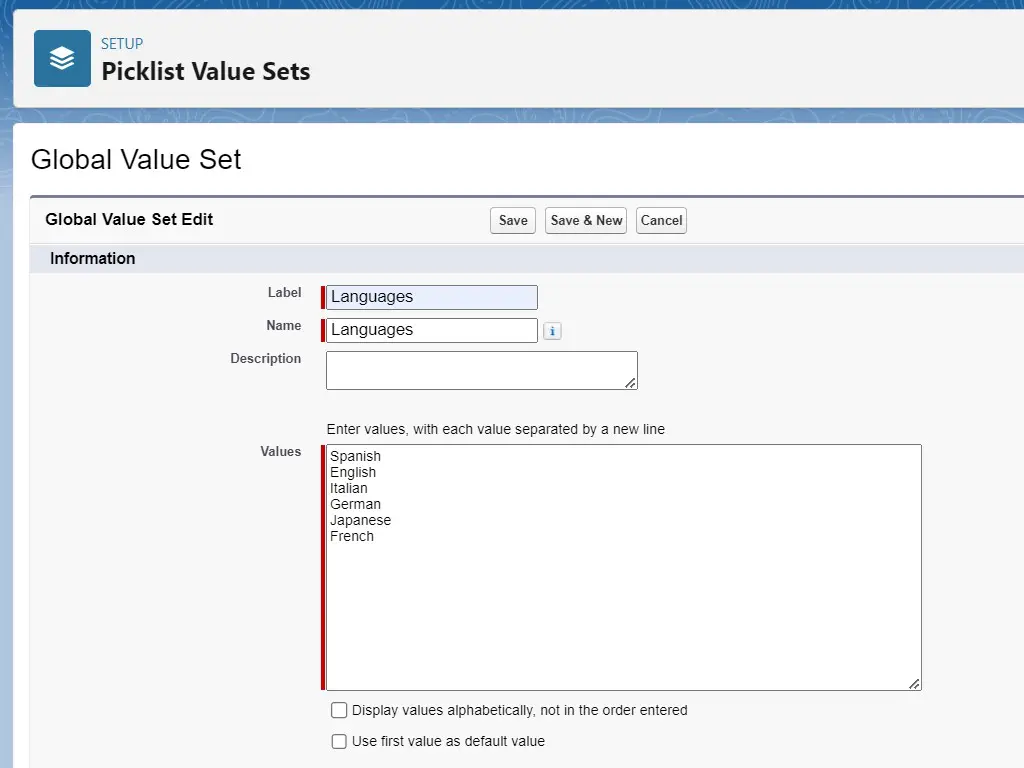
Step 1: Navigate to Picklist Value Sets
- Click on the Gear icon (Setup) in the top right corner.
- In the Quick Find box, type “Picklist Value Sets” and select Picklist Value Sets.
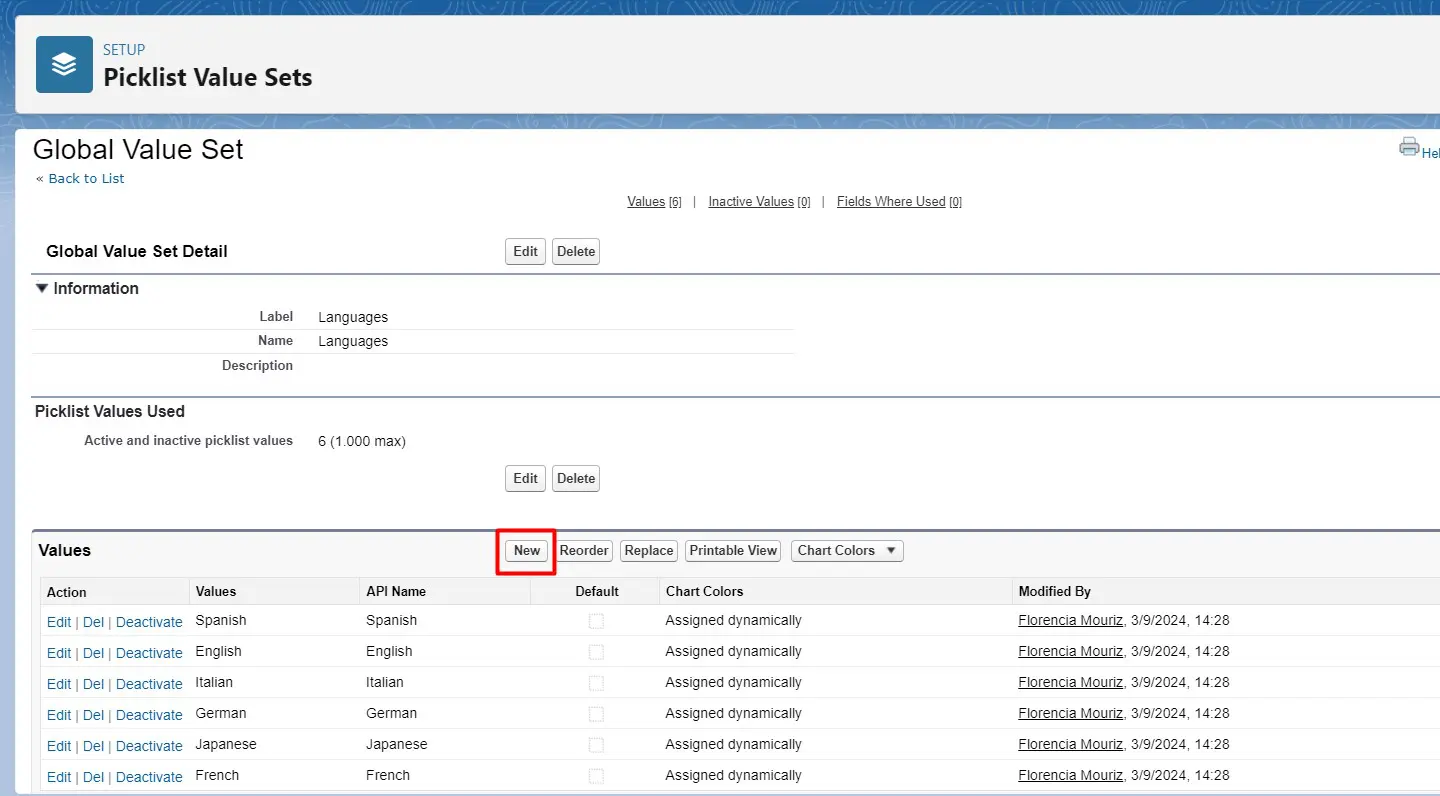
Step 2: Select the Picklist Value Set
- In the list of Global Value Sets, click on the name of the Picklist Value Set to which you want to add new values.
Step 3: Add New Picklist Values
- Once inside the specific Picklist Value Set, you’ll see the existing values listed.
- Click New to add a new value.
- Enter the value(s) you want to add in the Value field. You can add multiple values at once by entering each value on a new line.
Step 4: Set Additional Options (Optional)
- Default: If you want one of the new values to be the default value, you can select it here.
- Sorting: Salesforce automatically sorts values alphabetically. You can adjust the sort order by manually reordering them if necessary.
Step 5: Save Your Changes
- Once you’ve added your values and configured any options, click Save.
Additional Tips:
- If you want these values to be available across multiple objects, ensure you’re editing a Global Value Set.
- For individual object-specific Picklist fields, navigate to the object’s field settings instead of the Global Value Set.
This process will help you efficiently create and manage Picklist values in Salesforce.
The XL-Connector streamlined alternative to creating values
With XL-Connector, this process can be much easier and can be done directly from the Excel spreadsheet. Creating values in a global picklist in Salesforce using XL-Connector involves the following steps:
-
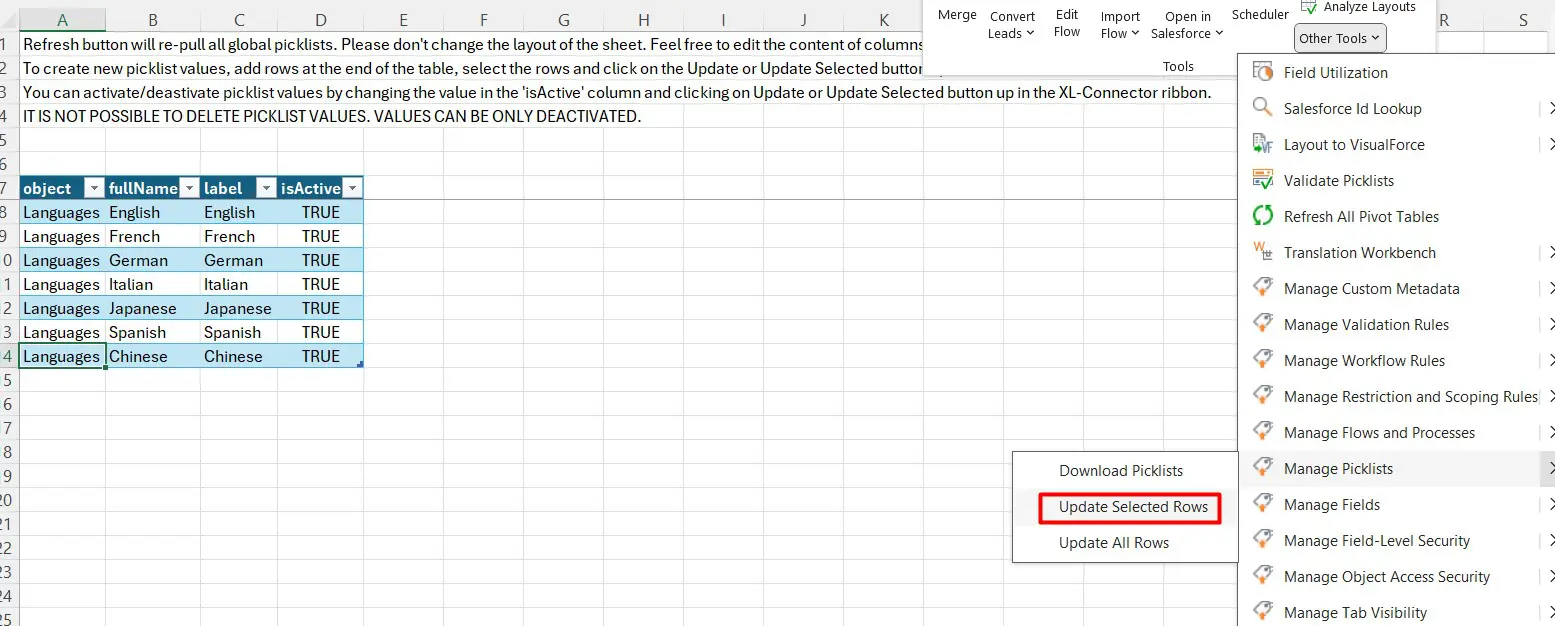
- Navigate to Manage Picklists: Select the option for downloading Custom or Standard picklist value sets (Values for Global Value Set cannot be added via API).
- Select the picklist: From the available options, select the picklist you want to add new values to.
- Create New Values: add rows at the end of the table to create new values.
- Upload Changes: Select the new rows and click Manage picklists→Update selected rows.
How to Update Global, Standard and Custom Picklists in Salesforce
Updating Global, Standard, and Custom Picklists in Salesforce involves slightly different steps depending on the type of picklist you’re working with. Here’s how you can update each of them:
1. Updating Global Picklists (Global Value Sets)
Global Picklists are managed centrally and can be used across multiple objects.
Step 1: Navigate to Global Value Sets
- Go to Setup by clicking the Gear icon.
- In the Quick Find box, type “Picklist Value Sets” and select Picklist Value Sets.
Step 2: Select the Global Picklist to Update
- Click on the Global Value Set you wish to update.
Step 3: Edit or Remove Values
- To Edit: Click the Edit link next to the value you want to change, modify it, and click Save.
- To Remove: Click Del next to the value you want to remove, then confirm the deletion.
Step 4: Save Changes
- After making the necessary updates, ensure to click Save to apply the changes.
2. Updating Standard Picklists
Standard Picklists are fields provided by Salesforce on standard objects (e.g., Lead Status on Leads).
Step 1: Navigate to the Standard Object
- Go to Setup.
- In the Quick Find box, type the name of the standard object (e.g., “Lead”).
Step 2: Follow the same steps as for Global Value Sets
Additional Considerations
- Dependencies: Be cautious of any dependencies, such as field dependencies or record types, when updating picklist values.
- Inactive Values: If a value is no longer needed but should not be deleted (to retain historical data), you can deactivate it instead of deleting it.
- Bulk Updates: For bulk updates, consider using tools like XL-Connector.
The XL-Connector alternative to updating values in Picklists
Updating values in picklists in Salesforce using XL-Connector can be much more efficient. These are the few steps to perform this operation:
- Navigate to Manage Picklists: Select the option for downloading picklists.
- Select Picklist: Choose the picklist you want to update.
- Edit Values: Make the necessary changes to the picklist values.
- Save Changes: Save the updated picklist to your Salesforce instance by clicking Manage Picklists→Update selected rows.
Using XL-Connector to update picklist values in Salesforce offers several advantages over performing these updates directly within the Salesforce interface. Here are the key benefits:
1. Bulk Updates
- XL-Connector allows you to handle large volumes of data at once. In Salesforce, bulk updating is more cumbersome, often requiring multiple manual changes through the interface.
2. Efficiency and Speed
- Working in Excel is faster for tasks involving data manipulation, like copying, pasting, or reorganizing values. XL-Connector enables you to make bulk edits in seconds, whereas Salesforce requires navigating through multiple menus, which can be time-consuming.
3. Data Validation and Error Checking
- Excel’s built-in functions (e.g., find duplicates, data validation, conditional formatting) can help ensure data accuracy before pushing it back to Salesforce. In Salesforce, identifying and correcting errors requires more effort and navigation between different screens.
4. User-Friendly Interface
- Many users find Excel easier to navigate and use than Salesforce, particularly for editing and reviewing long lists of data. The familiar Excel interface allows users to make changes quickly without learning complex Salesforce tools.
5. Fewer Clicks and Simplified Workflow
Using tools like XL-Connector can significantly streamline your picklist management in Salesforce. By leveraging its powerful features, you can ensure consistency, reduce errors, and save valuable time. Whether you are creating or updating picklist value sets, XL-Connector provides the tools you need to manage your metadata efficiently.
Ready to enhance your Salesforce admin productivity? Download a free trial of XL-Connector today and experience the difference it can make in your metadata management.
Start a 14-day free trial of XL-Connector and see an immediate boost in your data management!


Xappex CRM data management solutions

G-Connector for Salesforce
Connect your Salesforce data to Google Sheets in a two-way sync.

XL-Connector for Salesforce
Connect and export your Salesforce data to Excel.

Looker Studio for Salesforce
Connect Salesforce reports and queries to your Google Data Studio dashboards.

Excel Merge
Calculate advanced Excel models. Generate Excel documents based on Salesforce data. All with a single click from a Salesforce record page.

XL-Connector 365
Connect and sync Microsoft Excel on all platforms with Salesforce.