
How to Manage Salesforce Validation Rules in bulk?
Have you ever filled out a form online and got an error message like “Please enter a valid email address”? Those are validation rules at work! Salesforce uses similar rules to ensure the data you enter about your customers, leads, and other important information in your Salesforce objects (both custom and standard) is accurate.
This blog will explore why validation rules are important in Salesforce, how to create them, and methods for managing them in bulk using XL-Connector.
What are Validation Rules?
Validation rules enforce specific conditions that must be satisfied before a record can be saved. If data fails to comply with these conditions, Salesforce prevents the record from being saved and displays an error message.
Applicable to both standard and custom objects, validation rules contribute to maintaining data accuracy and reliability within the Salesforce platform.
How do we create Validation Rules in Salesforce?
To create a validation rule in Salesforce, define the criteria for saving a record and specify the error message if the requirements are unmet.
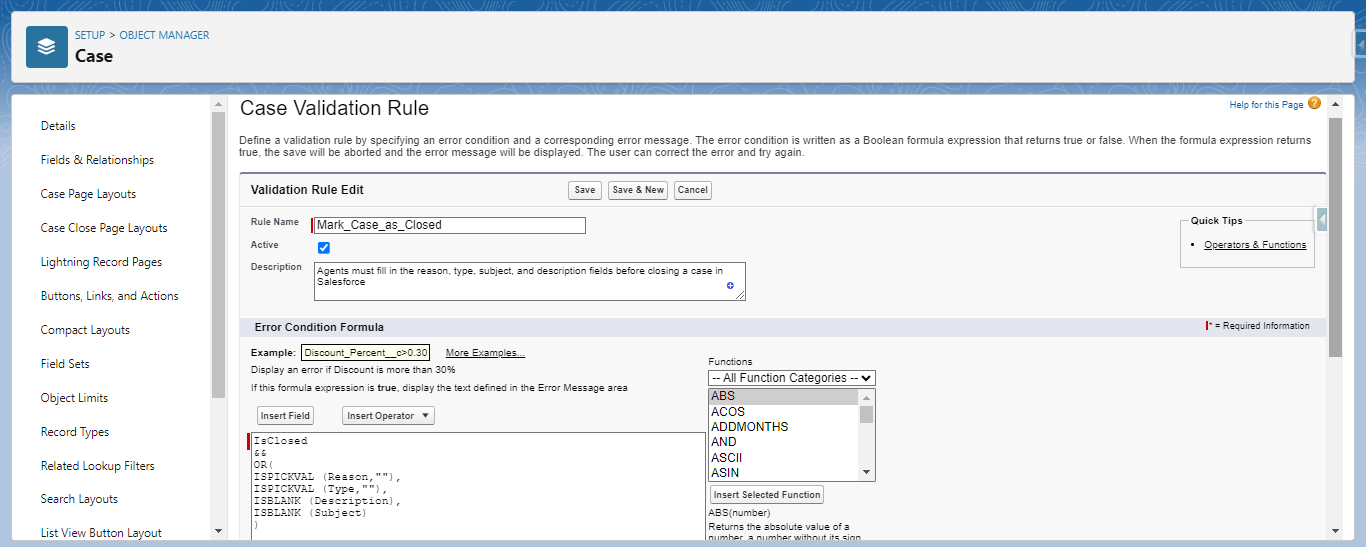
- Access Object Manager: Navigate to Salesforce Setup and select Object Manager. Choose the object for which you want to create a validation rule.
- Create New Rule: Select “Validation Rules” from the left sidebar and click “New.”
- Define Criteria: Name the rule, describe its purpose, and enter a formula specifying the validation conditions in the “Error Condition Formula” box.
- Set Error Message: Create an error message explaining the rule violation and choose where the error message will appear (e.g., at the top of the page or next to a specific field).
Save the rule and activate the rule.
For example: Agents must fill in the reason, type, subject, and description fields before closing a case in Salesforce to collect consistent data for analysis.

Also Read: Validation Rule Considerations
Managing Salesforce validation rules is vital for keeping data accurate, but handling them one by one can be tedious. The process often involves switching between various screens, understanding complex formulas, and ensuring that all rules remain consistent, which can be inefficient.
Additionally, the lack of options for bulk editing makes it difficult to update multiple rules at once. To enhance efficiency and control, organizations need to adopt better approaches.
How to easily handle Salesforce Validation Rules in bulk?
Ever need to make changes to a bunch of validation rules in Salesforce at once? Bulk editing using XL-Connector can be a real time-saver! This section will show you how to download all your validation rules, make edits, and upload them back to Salesforce using XL-Connector.
Here are some situations where bulk editing can help:
- Creating new rules: If you’re setting up a new system with specific data requirements, you can make all the validation rules you need in a single spreadsheet and upload them in bulk.
- Updating multiple rules: Maybe your company policy on data formatting changes, and you need to update all validation rules related to that format. It allows you to make those changes to all relevant rules simultaneously.
- Reviewing and cleaning up existing rules: Over time, you might accumulate validation rules that are no longer needed. It can help you to easily download all your rules, review them, and delete outdated ones.
Download All Validation Rules from Salesforce
Easily manage your validation rules by downloading them into an Excel spreadsheet. This gives you a complete overview for better handling.
To download the validation rules:
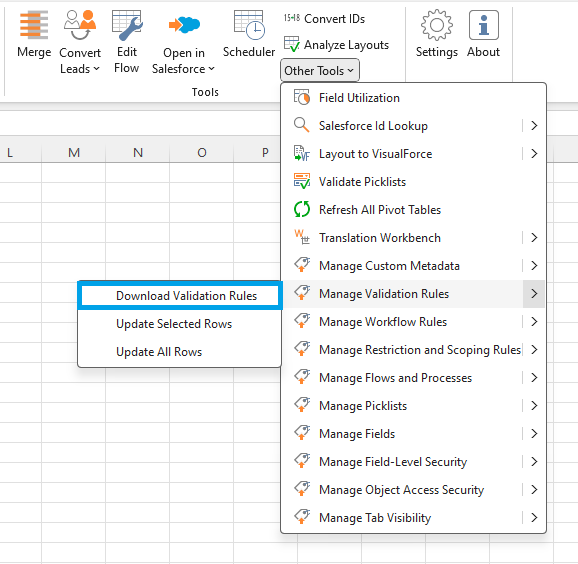
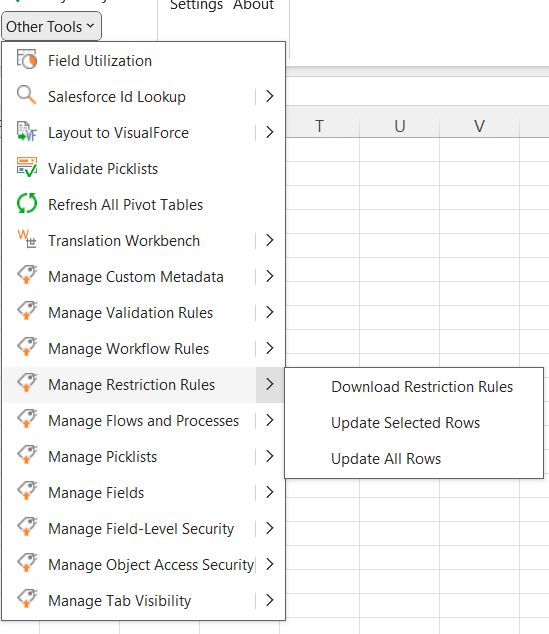
- Click on Other Tools in XL-Connector Ribbon, then Manage Validation Rules, and select Download Validation Rules.
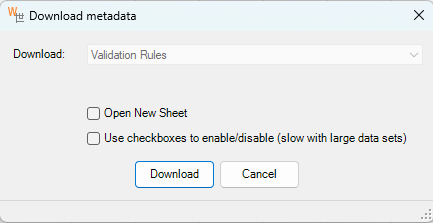
- A dialog box will allow you to download all rules from your Salesforce org into existing or new sheets.
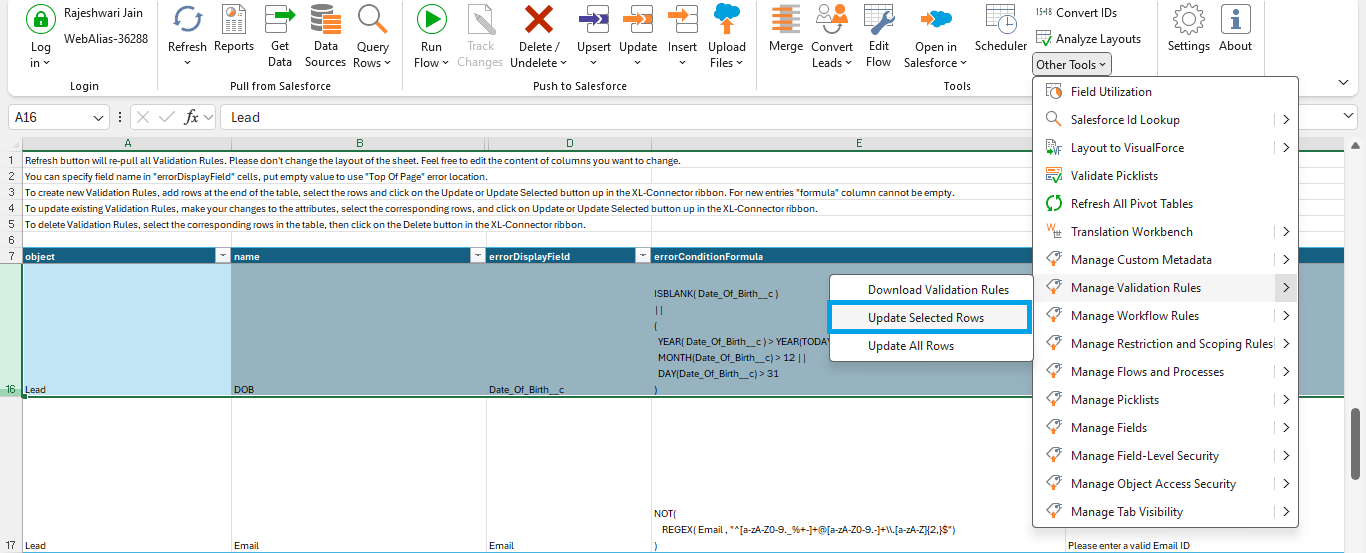
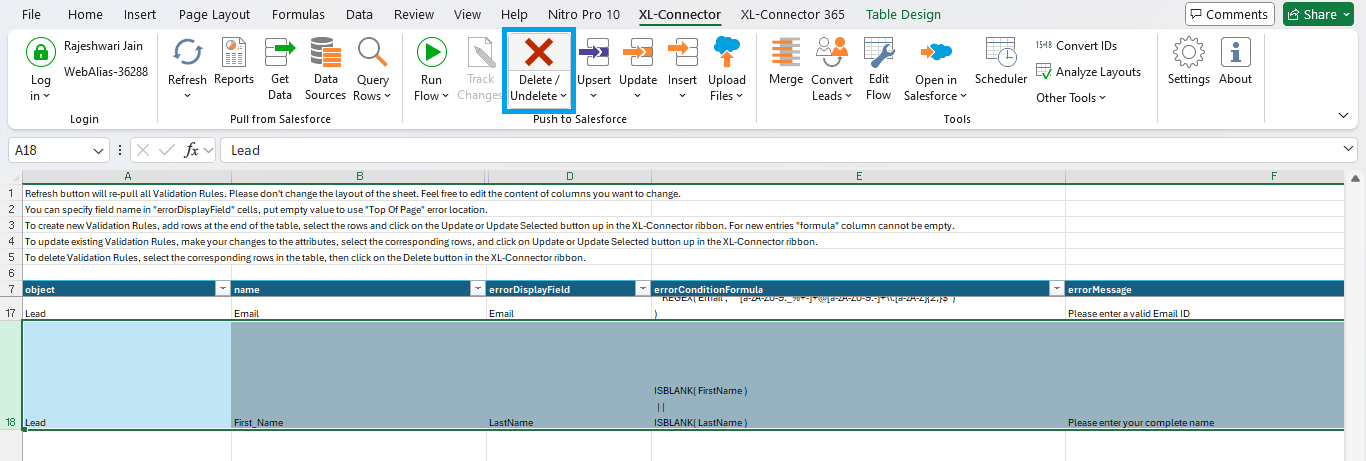
- Click the Refresh button to re-pull all validation rules.

Create New Validation Rules
Adding new validation rules is simple. Insert rows at the end of the table, select them, and click the Update or Update Selected button in the XL-Connector ribbon.
Ensure the “errorConditionFormula” field is filled for new entries.
Update Existing Validation Rules
After downloading your validation rules, you can directly edit attributes like the error condition, error message, and display field in the spreadsheet. To update:
- Make your changes to the desired attributes and select the corresponding rows.
- Click on Other Tools, then Manage Validation Rules, and select either Update Selected Rows or Update All Rows.
Delete Validation Rules
To delete validation rules in XL-Connector, select the desired rows in the table view. Then, go to the XL-Connector ribbon and click the Delete button to remove the selected rules.
XL-Connector, your go-to metadata management tool
These Validation Rules management tools are just one of many features present in XL-Connector’s metadata toolkit that combined with Excel’s versatility can help Salesforce admins to greatly increase their productivity and efficiency.
XL-Connector is the only Excel to Salesforce connector in the Salesforce AppExchange that provides a complete assortment of metadata management tools. These tools enable management of such things as fields, restriction rules, processes, picklists, security settings, custom metadata and much more.
Tasks that normally take several days, like updating the descriptions and help texts of data fields, will take minutes with XL-Connector.
Learn more about how to streamline your Salesforce metadata management with XL-Connector
Conclusion:
Effective use of validation rules in Salesforce ensures that your data meets specific criteria, enhancing overall data quality. Learning how to create and manage these rules, especially in bulk using tools like XL-Connector, can make this process more efficient, saving your team hours of work. This feature, combined with other powerful metadata tools offered by XL-Connector, will help you maintain a clean, reliable and consistent Salesforce database.
Start a 14-day free trial of XL-Connector and see an immediate boost in your data management!

Xappex CRM data management solutions

G-Connector for Salesforce
Connect your Salesforce data to Google Sheets in a two-way sync.

XL-Connector for Salesforce
Connect and export your Salesforce data to Excel.

Looker Studio for Salesforce
Connect Salesforce reports and queries to your Google Data Studio dashboards.

Excel Merge
Calculate advanced Excel models. Generate Excel documents based on Salesforce data. All with a single click from a Salesforce record page.

XL-Connector 365
Connect and sync Microsoft Excel on all platforms with Salesforce.